Painting Rituals

One of my painting habits is to not clean off my palette until I am finished the painting I am working on. I use a metal tray for mixing my acrylics on and when I’m finished I soak it in water, the acrylic softens up and I peel it off.

Some artists are able to work on multiple paintings at one time. However I don’t have the time or space and so that mean I work, as often as I can to try to finish a single painting. Unless it’s starts to irritate me and that’s when I abandon it and start a new one. I don’t have many painting orphans but I’d rather take space from the painting than keeping working on something that I’m struggling with. I find time away means I can approach everything with fresh eyes.

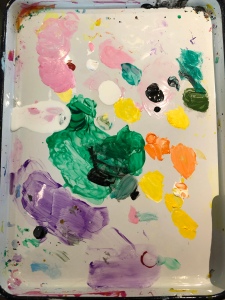
So this I’m my last palette from the painting I completed today. Now that I’m finished my lasted tree painting I’m prepping my canvas and cleaning up to start fresh.

The latest painting is on a 12×36 canvas so it is super awkward to photograph but I like that it emphasizes the verticality of the trees.

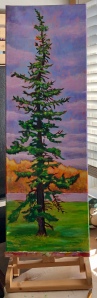
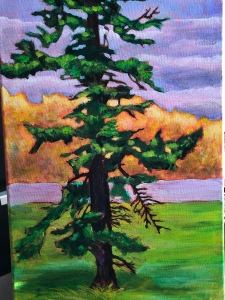
This current series of paintings is based on the idea of forgotten urban trees. I’d just attended a landscape painting workshop and the artist was talking about being an outdoorsy, hiking type person and talking about all these provincial parks that he had visited. Driving home I noticed a row of gnarly trees coming into town and thought I would much rather paint the trees that have been planted and left to fend for themselves. The ones that are used to beautify cities but are also ignored and forgotten. The ones that are a little bent, a little dead, and have their own beautifully, ugly qualities.

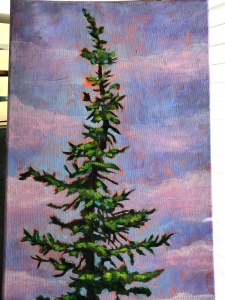
I have no interest in hiking, none at all. So my trees are the forgotten trees. The trees that have thrived, or not within an urban environment. You would probably drive right past them and think “the city needs to do something about that eyesore” and forgot about it a second later.

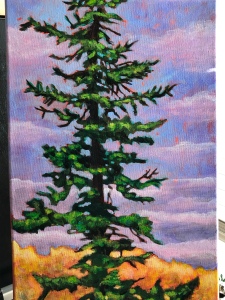
You’ll notice the lilac white band across the painting. That is the hint of the highway that this tree lives beside. The highway is not the subject but the context. I didn’t want anyone to believe that this tree was situated anyplace but beside the highway so that band is the reminder that despite the situation, the context, this tree has continued to grow and make the best of its situation. Without been very obvious about it. In the future I might add vehicles but, for now I’ll stick to the subtle.

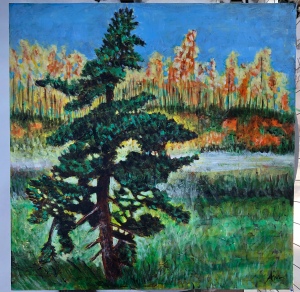
This painting is part of a series of paintings that I am making for a regional art exhibition. This year it is in Tumbler Ridge,BC and I plan to have three paintings ready for the end of April. I already have two finished but I’ll keep painting and then choose from what I’ve finished. This is the last one I finished.

So plan today is to finish prepping the next canvas and sketch out my painting. Another tree coming up!

Nice to see ya!

Its been a while since I had time to even think about posting here. Life has finally slowed down enough that I can do things that are just for me again.

So my last post was in 2015 (holy cow…really!). From that time I have started and completed my Masters in Education, survived and fixed 4 separate basement flooding emergencies (the last one requiring that I take 5 days off of work to deal with) and continued working full time. Something had to give and it was my art practice. Everything art-related slowed down and it wasn’t until I started working on my thesis to complete my masters that I finally began to think about that creative side of me. But even then I wrote and defended my thesis in 6 months, which if you don’t know, is pretty darn quick.

My thesis was about how my artistic practice and my teaching practice, as an art teacher are related and how they inform and enhance one another. I actually really enjoyed the writing part of the thesis and realized that I do like to think deeply about the things in my life and explore how my life and my art are connected. During the hiatus from art-making and then jumping back into it my art-making has changed and the imagery that I feel drawn to creating has also changed a great deal.

Prior to starting my thesis I always thought about my art-making as being super eclectic and actually felt kinda bad about it. I looked at other artists and saw that they had that singular focus and vision in there work and I felt all over the place. I was exploring painting, drawing, charcoal, watercolour, pottery, art quilt making just to name a few. I had so many supplies in my studio that it was overwhelming to even contemplate organizing it. With the consistent basement/studio floods over a period of three years, I began to weed out the supplies that were for projects that I didn’t feel a connection too. For example, I had begun to explore art-quilting and within a couple of months had even been asked to write an article for a magazine. However, I got bored. The thought of sitting in front of the sewing machine or hand stitching was tedious and I was bored.

I wanted to be excited to get started on the next project. I wanted to be excited about seeing what other people were doing with the same medium. But I wasn’t, not about certain materials that I was experimenting with. So I pared back my supplies to two mediums, painting and pottery. I enjoy the creation process in both those mediums and get excited about experimenting with different techniques. And always, always, a completed project leads to ideas for the next.

I told a workshop in May of 2019 that really influenced how I was painting and made me excited about the process again. Here are a few of the paintings that I completed since September 2019.


Creating an Art Habit

My goal is to make creativity a habit. To be able to easily and simply slip into the state of creativity without “the worries” sitting on my shoulder. I don’t worry about making the art-the technical aspects of being an artist. I find that very comfortable.

I wonder what I am going to do with it. I can only produce so many things before I say “Welp,  what am I going to do with this one”

I worry about “the vision”. I know that I can make the work but I have never been one to be able to say
“This is My Vision”,  at least not right away. I don’t like being confined to one direction and my creativity bounces me around the studio quite a bit!

I am compelled to make and create and I get mentally itchy if I am not stretching that creative muscle consistently. But do I say I paint landscapes or abstracts or figuratively….um. ..yes to all. I follow my fancy but I think I need to figure out the reason of my fancy.

So to help foster that creative habit I have been reading Twyla Thorpe’s The Creative Habit. I have also been making, without worry- every, single day. Right now I think that the worries don’t matter. They will work themselves out however they are meant to be worked out.

I am participating in the Documented Life Project over at Art to the 5th. It’s free and it’s interesting to document daily, in an artistic way, everyday. But of course being me, it wasn’t quite enough to do one book.

So I have my main book for DLP 2015

image

And my first page.

image

Which I added a bit to…My Year Of Awesome.

image

But then I wanted a more of a day planner type book. Something that could be used everyday. To think, to plan and to conspire the possibilities.

image

I started my planner by adding flaps and washi tape. This way I have a bit more space for play.

image

image

The flap that I added to this page is the right hand side that is dark green. I’ve listed my goals for the week and put some lines in with a paint pen, in the center,  so that I can make lists and take notes. I tried to pull an element from the DLP, the circles and butterflies into this second planner.

And finally, I pulled on of my mixed media sketchbooks and a quick collage. Something than can just be. I may use it later, I may not.

image

So a few things on my plate for this year…and I didn’t even talk about some of the things that I have dreamed of for My Awesome Year.

An Upcoming Year of Awesome

Perhaps I am just feeling optimistic today but I have a strong sense that 2015 is going to be a Year of Awesome!

I’ve been enjoying a well deserved break from work and spent some time catching up on DIY projects around the house.

We finished a sofa table a new side table for the living room.

image

image

Very, very happy with the rustic, farmhouse look.

I also installed wallpaper on the stairwell on new years eve. ..yes I’m a party animal…can’t hold me back..lol.

image

I love this wallpaper so much. A couple of trim, finishing bits to do but the hard part is finished.

As for art I have been making stuff and experimenting with different ideas.

image

image

image

image

image

image

image

image

The next two charcoal drawing were finished just before my vacation and I put quite a bit of time into them. They were both gifts. One for my brother and a secret Santa gift for a co-worker.

image

image

Holy when you put it all together like that it shows how much I’ve done in the last 10 days…I think I’ll need a vacation from vacation!

Thanks for looking!

Charcoal Faces and Painting

Recently I have been working with charcoal and practicing my faces and portraiture.  I like the challenge of capturing a likeness of the individual personalities.

Here are a few progress and completed images.

image

image

The next one is for a secret Santa gift. I like to make something for whoever I pull for secret Santa at work. One year it was a watercolour painting. This year is charcoal.

image

image

I’ve also been updating my Etsy page with a few paintings. Mostly they were completed on paper and mounted onto a canvas.

image

Budgies are available here

image

Poppies are available here

image

And butterflies are avaliable here

New Ideas

I thought that I would show a few of the things that I have been collecting in my Pinterest boards lately.

If you would like to follow me I am here

I LOVE Pinterest SO MUCH. Basically because I am such a visual person that I like to be able to scroll through a board and see what I was interested in or that I wanted to remember.

I recently started reorganizing them a bit more and breaking down some of my broader categories into smaller, more manageable pages. So rather than have Art Class- Drawing and Painting as a catch all I have added a could of new Art class Categories.

So onto what I am interested in right now!

I am loving the artwork of Stephanie Ledoux. Her website is here!

I love that she has included her travel journals going down the right side of her blog and you can look through them. Such as this one

http://tripamadagascar.blogspot.fr/

And I loved getting a look inside her studio.

Can you believe how beautiful these are!

I am using her as an influence for my current class project and an incorporating the idea of collage with charcoal portraits. I can’t wait to see what my students create!

I’ve also be intrigued by street art and the idea of incorporating some concepts and processes in the classroom. Not the spray painting obviously but the juxtaposition of black and white and frenetic colourful lines and textures.

Such as this one
And this
And this

I would have linked directly to the artist if they had a website. I couldn’t find anything concrete and have tried to make sure to reference the artist name in pinterest if possible.

Oh…I also love this artists work. Jylian Gustlin


I would love it if you left me a link to your favourite artist right now in a comment. I’m always excited to see what is being created out there!

Artsy Faces Update

My artistic endeavours have taken a few detours over the past month. Organizing my 620 sq. feet of basement space to be a studio was/ is a huge task. Still not quite finished but it’s really it’s down to tweaking things.

I then decided I needed to paint my bedroom. This lead to reorganizing and purging of all the cloths that are too big or unworn.

And I started knitting. I knew I was in deep when I knit 5 scarfs and a pair of boot cuffs in four days. All while watching three seasons of Suits in…um…4 days. It’s really good if you haven’t seen it.

However I did realize I had not posted any updates of the faces I was working on. I finished all the background painting and now need to do the pencil crayon part. So you get a page by page update! Lucky you!

Cover…I need to figure that one out. So no point in posting a picture.

Mermaid and Deer Girl

IMG_0540.JPG

Big Hair Girl and Russian Nesting Doll Girls

IMG_0541.JPG

Owl Girl and Peacock Girl (unfinished)

IMG_0542-0.JPG

Cat Girl and Medusa

IMG_0543.JPG

Octopus Girl and Fairy Girl

IMG_0544.JPG

Flower Girl and Steampunk Girl…these two have less going on right now in the theme department but that’s the plan right now.

IMG_0545.JPG

Girl on fire and Siren

IMG_0546.JPG

As soon as I can drag myself away from knitting I will get these finished. It’s easier to watch tv and knit than it is to do this type of work. I just finished Call The Midwife. Love that series too ( yes I did it over a couple of days…no commercials is heavenly!)

I think I watch too much TV! More Art less TV on the agenda.

Artful Island

My art supplies have/had multiple homes. The entertainment unit in the living room has two cupboards full of supplies. The office had a huge cabinet that had more supplies…plus the closet in the office…and behind the door in the office. The room that we call “Lucy’s Room” has the dogs kennel (it’s a big kennel for an 85 pound dog) a freezer, a cabinet and closet for extra kitchen stuff and shelving for more art supplies.

So I started moving all that stuff downstairs when we started doing the flooring. The intent is to have a functional, working studio that is organized and holds everything that I want.

I need a table for working, a space for my laptop, a sewing space, supplies storage, fabric storage, canvas storage and a place for the treadmill.

Luckily the basement space is huge and I already have spaces delineated for studio, sewing and books.

However it now looks like this….prepare yourself…

IMG_0468.JPG

IMG_0472.JPG

The cabinets that I already have are not being used to their best potential and everything needs a proper home. So the first task was to make an island for the centre of the room that will hold all my canvases and paper and give me a workspace that can take whatever I throw at it.

And I don’t want to spend that much money.

We started with repurposing some bookshelves. Luckily I had 4 that worked together and that made it as big as I wanted the island. I’m tall and I didn’t want to hunch over a table so the table is quite high.

We screwed them together and then added a 1×4 frame around the bottom.

IMG_0476.JPG

IMG_0474.JPG

Then using 2×4’s we create a structure that we could lay shelving on so that the inside of the island could hold paper and canvases.

IMG_0477.JPG

IMG_0479.JPG

IMG_0478.JPG

Next we had to make a sturdy top and link everything together. More 2×4’s and another frame structure and a whole bunch of screws and we had a good space to lay our top on.

IMG_0485.JPG

IMG_0484.JPG

I forgot to take picture but we did add dome vertical 2×4 supports under the frame that we made…just in case I decided that I wanted to dance on top of the island…not likely but you should always we prepared!

Next we added a sheet of 1/2 inch plywood that we cut down to overhang by two inches all the way around.

IMG_0489.JPG

The final step was to add some 1×2 all the way around the top to disguise the edge and make it look like a finished top.

IMG_0493.JPG

IMG_0492.JPG

So now I have a 6 foot long and 3 foot wide art island. I did paint the raw wood light grey. Simply because I didn’t want to go too crazy on the colour on the top. I did consider a funky colour but thought it would be a bit much.

Yay!

The cost ended up being under $80 with the most expensive thing being the plywood for the top. The 1×2’s and 2×4’s were not that expensive and reusing thing we already had really made the biggest difference.

So the next post is going to be the completed room. Soon after the island was built it was stacked high and I was unloading and reorganizing and the whole place is/was a chaotic, hellish mess. I know that it has to get worse before it gets better but…whoa.

Desk Makeover

As we were working on doing the new floors we also decided that it would be a good time to declutter some of the rooms in the house. Part of that meant getting rid of accumulated stuff such as old paperwork and organizing the HUGE amount of yarn that we have. I also had to start moving more of my art supplies downstairs where I am going to be setting up a proper studio.

One of the things that also needed a makeover was a desk that I have had since Grade 8 or so. Mom and Dad made the desk for me and I have hung onto it for (cough,cough) 25+ years…that sentence hurt to write!

Originally it had a rectangle of pink on the top and the drawers were painted pink. Sometime in the 90’s Mom decided to paint it and it stayed like that ever since.

IMG_0429.JPG

Sorry I forgot to take one with the drawers in. The top was its own particular brand of hideous. It had this weird texture to it and sort of looked like mould. I never liked it (sorry Mom!)

So the first thing I did was paint the body and drawers dark grey.

IMG_0431.JPG

Do you like my new apron? It’s for work…I enjoy the cats and my previous one had owls on it but was quite well loved.

IMG_0434.JPG

The idea was to sand the top and see what happened. I was hoping that whatever paint mom had used would come off easily. Wishful thinking! After two hours of sanding I started to think that I could like the layered weathered look!

IMG_0437.JPG

IMG_0436.JPG

So then my goal was to make sure that I had plenty of layers of paint showing through. I do like that I didn’t obliterate all the previous work done on the desk before me. The pink from Grade 8 is still there. The layered, textured weirdness transformed into something interesting with the sander. And I added my own touch to it.

IMG_0438.JPG

Once I liked the top/was totally sick of sanding I decided that I liked it but it was a little too “candy” so I wanted to knock it back a bit. Since there was plenty of wood showing I pulled out some black wood stain and applied a layer over everything.

IMG_0443.JPG

Yay! So happy!

So next the adding of the new knobs was handed off to Mom since I suck at measuring and I just HAD to have the pulls with two screws.

So here is what the top looks like now.

IMG_0498.JPG

IMG_0499.JPG

The overall desk now looks like this.

IMG_0497.JPG

And the drawers look like this now.

IMG_0500.JPG

There are a few decorating thing still to do in the computer room but I am really happy with how it looks.

So next time I will start to show you what my basement studio looks like. We built a work bench/ storage island for under $100 so I’ll be posting about that. Be prepared for a little hoarder-sequel photos though. Moving over thing into one place really has highlighted how much stuff I have. I think I am going to have to quit buying supplies…nah.